You may also need the following items to complete the project:
Hacksaw to cut the dowel axles to length.
Wood file to round over all the edges.
Sanding block with 120 and 80 grit sandpaper.
A selection of drill bits.
A 12 inch disc sander or linisher with sanding disk attachment is very useful for trimming up end grain and squaring off small pieces of wood.
If you are going to make your own wheels for this wooden construction toy, a drill press is recommended. You will also need a 16mm spade bit, a 6mm drill bit and a circle cutter modified to cut wheels instead of holes.
Materials
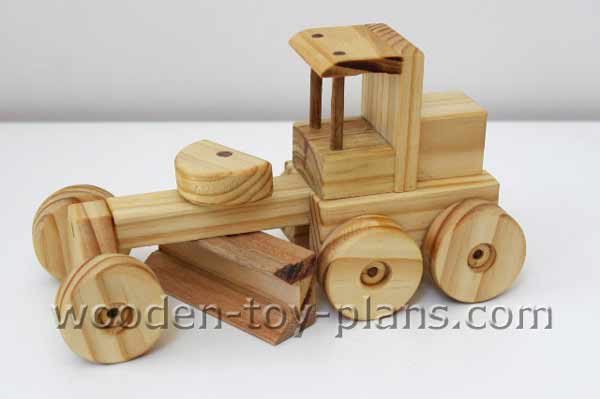
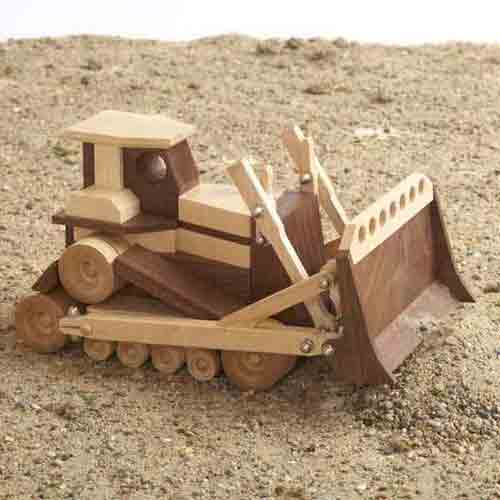
This wooden construction toy can be made with bits of wood left over from other projects.
I made mine from a piece of left over pine 19mm thick by 140mm wide by 500mm long. The wheels were also cut out of 19mm pine by 140mm wide.
For the six wheels, I used a piece less than 200mm in length, and the extra length was useful in clamping the piece while using the circle cutter.
The blade of the grader was made with a piece of skirting board 200mm long.
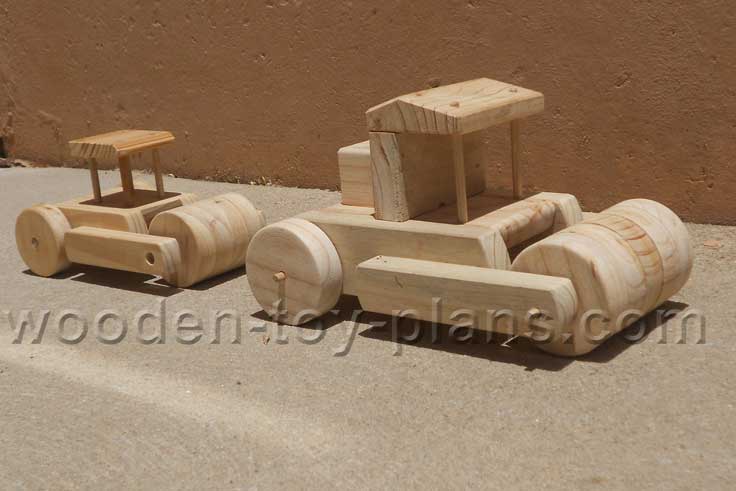
Step 1. The first step is to read through the instructions and study the plans and photos.
Step 2. Using a soft pencil and a ruler, mark out the component parts as shown in the drawing.
Cut out the parts using an electric jigsaw, a backsaw or a scroll saw.
Parts A to D are trimmed back to their proper sizes. A twelve inch disc sander is useful for trimming small pieces.
Glue the pieces that make up parts E and F and put to one side to set.
Clamp parts B together and drill the holes for the axles. At this stage, the holes are drilled for a snug fit. Do this in order to make sure things stay lined up when the parts are glued and clamped together.
Dry clamp parts A and B together, keeping the two parts B aligned with the axle dowels. Mark the pieces so that it will be re-assembled in the correct order. It is shown in red in the photo only to highlight the idea, so don't actually mark it in red. Apply the glue, clamp it and put to one side.
It is important that the axle dowels are left in place until the glue sets to minimize creep under clamping pressure. Once the glue has set, re-drill the holes to allow the axles to spin freely.
The blade of the grader, part C, is made from a piece of skirting board cut to a width of 30mm. It may also be made from a piece of timber that is 9mm thick, just chamfer one edge to the profile shown in the drawing.
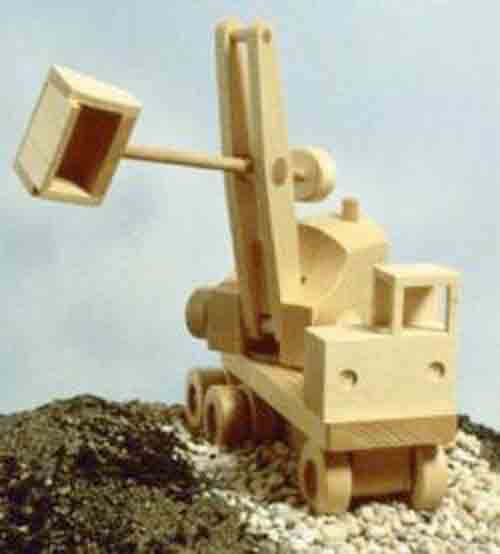
Cut and trim part D to size, and drill the axle hole using a drill press or drill guide. Use the 6.5mm drill bit to allow the axle to spin freely.
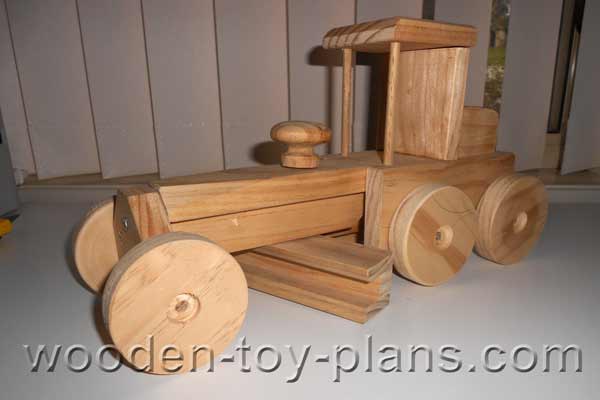
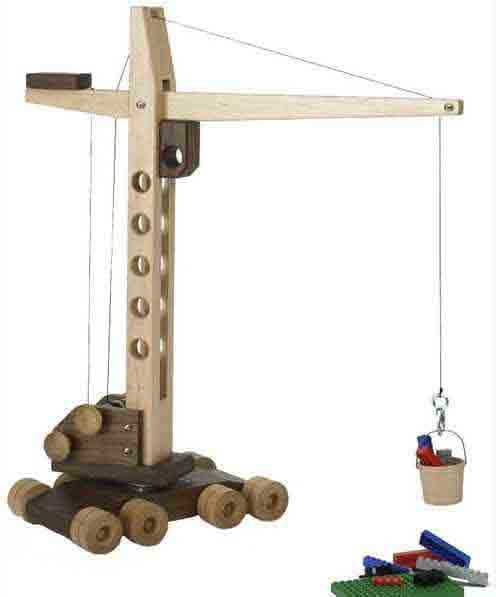
Drill the holes for the roof of the cab by placing it on the body as shown in the photo.
The photo shows how to fix the dowels on place by measuring the height the dowels are set so that they sit slightly above the roof. This is an idea borrowed from the Craftsman furniture movement.
Final Assembly
Glue the roof and engine block in place. Once the glue has set, lightly sand the whole toy with 220 grit sandpaper, removing all the sharp corners.
Attach the wheels with a small dab of glue.
Painting and Finishing
Leave it in it's natural state, or apply your favourite finish. I used yellow food colouring for a bright yellow finish. To make the wheels black, I mixed all the food colours together.
For information on food safe finishes and dyes, visit U-Beaut.com.au includes links to international suppliers.
Um sich wohlzufühlen, haben Pferde gerne noch etwas mehr als ein Leben in der Herde, gutes Futter, ständige Bewegung und einen luftigen Stall.
Ein Sandplatz zum Wälzen bietet die Möglichkeit, Verspannungen zu lösen und bereitet großes Vergnügen.Gras, Stroh, Kräuter und Heu alleine reicht Pferden nicht. Sie haben ein großes Knabberbedürfnis. Wildrosen, Weiden, Haselnuss, Buchen, Winden und vieles mehr erfreuen sich großer Beliebtheit.Sie wandern herum und suchen und knabbern. Die Hagebutten gehören zu den Früchten mit dem meisten Vitamin C. Die Pferde lieben sie.Hier knabbert Galine an Winden und Buchen.Auch getrocknete Brennesseln werden gerne gefressen.Ebenso sind Haselnusszweige sehr beliebt.Sehr beliebt sind auch die Weiden.Pferde stecken sehr gerne zusammen die Köpfe in einen Bottich mit täglich sauberem Trinkwasser.Immer wieder beknabbern sie sich liebevollund nutzen gerne auch jede Möglichkeit, die wir ihnen bieten, sich genüßlich das Fell zu pflegen.Deswegen haben wir Bürsten und Scheuermatten um den Stall herum verteilt.Sie danken uns unsere Mühen, indem sie gesund, ausgeglichen und zufrieden sind.
This is the hive that Jack built. And these are the plans to craft the hive that Jack built.
This horizontal hive model costs under $50 in materials, and is a two-hour project requiring only basic tools. It accepts 31 standard deep frames and features bee-friendly thick walls for durability and superior insulation. High legs mean convenient hive visits and no mice and possums to worry about. No wonder Jack picked this design for his hive!
Materials list
“Two-by-twelve”, pine, untreated. One 12’ board for the hive body. (Actual board size is 1-1/2” x 11-1/4” x 12’.)
Pine plywood, construction (sheathing) grade, untreated. One 4’ x 8’ sheet makes top and bottom for two hives. Thickness: 1/2” (actual 15/32”).
“Two-by-four”, untreated. One 10’ piece — for hive legs.
Wood glue (e.g., Titebond III), less than 1 oz needed.
3-1/2” deck screws, 20 per hive.
2-1/2” deck screws, 4 per hive.
1-1/8” deck screws, 50 per hive.
Rigid insulation (extruded polystyrene, such as Styrofoam) for insulating the top — 4’ x 8’ x 1” board enough for four hives.
Exterior acrylic primer/sealer (1 qt per hive) and light-colored exterior acrylic paint (1 pint per hive); a wide brush.
Tools list
You can complete this project using a variety of tools. This is what I use:
Circular saw with a guide — to cut plywood. For the guide, I use a factory-edge strip of 1/2”-thick plywood, 96” long by 6” wide, which I clamp to the work piece. (You can also use a hand saw, but do clamp a straight board to the work piece to serve as a guide.)
Sliding miter saw — to cut the “two-by” boards. (Alternative: hand saw with guide.)
Table saw — to cut frame rests (rabbets). (Alternative: router with 3/4” straight bit.)
Cordless drill; small bit for pilot holes; 1/2” bit for entrance; driver bits for screws.
Router with 3/4” and 1/2” straight bits.
Right-angle clamps, four (e.g., Bessey WS-3).
Building instructions
Step 1. Cut the “two-by-twelve” board into four pieces: 44-13/16” (2) and 21-3/8” (2). These are the walls. Mark the sides that will face outside. (Usually, the better-looking surfaces look outside. Also, the outer side of year rings should preferably face outside. If the board is slightly cupped, the concave side should look inside.)
Step 2. Check the width at both ends of each board that you’ve cut. The “two-by-twelve” lumber is supposed to be exactly 11-1/4” wide, but in reality it can be off by up to 1/8”, and one end of the board can be wider than the other. If all four pieces you cut have exactly the same width at both ends, all is good. If not — run them all through the table saw so the width is uniform (e.g., 11-1/8”).
Step 3. Cut a rabbet 3/8” by 3/4” along the top inner edge of the long boards. These are frame rests.
Step 4. Cut three entrances in the front wall. Each entrance is a slot 6” wide by 1/2” tall. They are 1-1/4” from the bottom edge of the board; 2” from each end, and in the center. To cut an entrance, drill a 1/2” hole then use a router with a 1/2” straight bit. (If you do not have a router, you can use a jigsaw instead.)
Step 5. Assemble the hive box. The long walls go between the end walls. Put them on a completely flat surface (e.g., concrete floor), the bottom side facing up (and rabbeted frame rests facing inside!). Clamp all four corners using right angle clamps. Assemble with 3-1/2” screws, three screws per corner. Do drill pilot holes to prevent board from cracking.
Step 6. Cut a rabbet (3/4” wide by 1/2” deep) along the entire inner perimeter of the hive box. The bottom will go into this groove. (Alternative: if you do not have a router to cut this rabbet, you can just screw the bottom onto the hive box, with no rabbet cut. In this case you should rip all four walls down to 10-3/4” width in Step 2.)
Step 7. Cut plywood as shown below. You will have the following parts, enough for exactly two hives:
Top (2) – 49” x 22-9/16”.
Bottom (2) – 46-3/16” x 19-3/4”.
Strip-1-Long, a (2) – 49” x 1-1/4”.
Strip-1-Short, b (2) – 21-9/16” x 1-1/4”.
Strip-2-Long, c (2) – 48” x 1-3/4”.
Strip-2-Short, d (2) – 22-9/16” x 1-3/4”.
Landing board, e (6) – 7-1/2” x approx. 1-11/16”.
Step 8. Insert the bottom and attach it to the hive body with 1-1/8” deck screws. Do not use glue so you can remove the bottom in the future, if needed (e.g., for cleaning or to install a screen bottom board). And yes, that’s Yarosvet, 5, masterfully performing the task. See, you have no more excuse to keep sitting on your couch! ☺
Step 9. Cut the “two-by-four” at 45° as shown. Make sure that the 1-1/2” (narrow) side faces up. Measure 30-1/2” on both ends and make angle cuts first. This will produce four 30-1/2” legs with one end slanted at 45°.
Step 10. Turn the hive body on its side. Mark 2” from the top edge of the box on the end wall. Position a leg and attach it with two 3-1/2” screws (marked X) and one 2-1/2” screw (marked O). Attach another leg on the opposite end wall. Then flip the box over and attach two more legs.
Step 11. Tilt the table saw 15° and run the landing board strip through it, removing one edge. You’ll have a strip approx. 1-11/16” wide, with one long edge cut at an angle. Cut the strip into six landing boards 7-1/2” long. It makes for a small, yet adequate landing board. If you have scrap pieces of larger boards lying around, you can make the landing board larger, up to 10” long by 3-1/2” wide.
Step 12. Center the landing strip under the entrance and attach to the hive body with two 1-1/8” screws, one on each side of the entrance. Pre-drilling the landing board is essential to prevent splitting. Repeat with the remaining two entrances. Your hive box is now ready!
Step 13. Now let’s assemble the top. The cut of the plywood allows for 1-1/4”-deep rim on one top, and 1-3/4”-deep rim on the other. In the 1-1/4” rim the short strips (Strip-1-Short, part b) go between the long strips (Strip-1-Long, part a). In the 1-3/4” rim the long strips (Strip-2-Long, part c) go between the short strips (Strip-2-Short, part d). Clamp rim strips at right angles, pre-drill, and connect on 1-1/8” screws, one or two per corner.
Step 14. Apply wood glue and attach the top plywood panel. If you have a pneumatic staple gun, use it with 1” staples. Otherwise pre-drill and assemble on 1-1/8” screws.
Step 15. Cut a piece of insulation board 48” x 21-5/8” and insert it into the top. It will fit tightly and will usually stay put. If not, use some construction glue to secure it to the top.
Step 16. Apply two coats of primer/sealer, and then one coat of light-colored paint on all exterior surfaces of the hive box, legs, and top. Pay special attention to exposed edges of plywood and board. The hive is ready!
Considerations
Put a rock or concrete block on the top so it does not get blown off by wind. If the rock is heavy, position it towards the edge, above a wall, so it doesn’t push through the top.
Installing the hive at a slight (1°) incline forward helps rainwater run off the top.
Cover the frames with a layer of burlap. This way you won’t disturb the bees by opening the hive.
The follower board is a piece of 1/2” plywood 18-5/16” wide by 9-1/2” deep, attached to the center of a top bar (19” long, 1” wide, 3/8” thick) with three 1-1/8” screws.
The painted top should last many years. You can extend its life by covering it with a piece of aluminum flashing, 24” wide by 50-7/16” long. Lay flashing flat; center the top on it; score the perimeter with a utility knife; cut out flashing corners; fold the flaps, tapping with a mallet or woodblock; secure flashing to top’s sides using a manual staple gun with 3/8” staples.
And now... sh! Let’s peek inside.
This is a very good horizontal hive model. It can further be perfected by a number of modifications:
Replacing Styrofoam with a more ecological insulation.
Installing hinges on the top for ease of opening.
Making a gable roof for pretty looks and improved insulation.
Attaching a screen bottom board with oil trays to catch mites, small hive beetles, etc.
Decorating the hive box!
If you haven’t signed up for our email list yet, please join it below so we can notify you when free plans for the above modifications and other horizontal hive models become available. (Only 2-3 emails per year, and you can unsubscribe at any time.) We are working on bringing you the bees... and the smile!
— Dr. Leo Sharashkin, Editor of “Keeping Bees With a Smile”
This gun concealment shelf makes a great entertainment center, console table or bookshelf while providing a secure place to store a couple of rifles or any other items you want to keep out of sight. It features drop down concealed compartments that are completely hidden when stowed and feature soft lower dampeners and ball bearing slides for smooth reliable operation. Manufactured in southwest MO, this hidden gun shelf, is made with high-quality materials and hardware, making it built to last. Compartments can be outfitted with closed cell foam inserts or coated gun hooks for maximum flexibility upon request.
Compartments can be outfitted with closed cell foam inserts or coated gun hooks for maximum flexibility upon request.
Dimensions 55"x18"x38" tall
Concealed storage areas without foam insert.
46"x12"x2.25"
Requires truck freight shipping. Please contact for exact quote